"fiux2" Week 4 - Create Your First SAP Fiori App
(See first post in this series — “fiux2″ – The openSAP Fiori Course – 2016 Edition — for links to the other posts).
Well we’re pretty much at the half-way point in this course, and it’s going well. This week sees the end of the deadline extension for the Design Challenge that I wrote about in Week 3, but mainly is about introducing the course attendee to some basic hands on with the SAP Web IDE. Let’s have a look at how this unit went.
Unit 1 “Introduction to SAP Web IDE”. I’m guessing that the majority of this course’s attendees may well have some familiarity with SAP’s now-flagship interactive development environment (IDE). It had an interesting genesis, growing from an initial offering called App Designer, which, remained a young product but seemed like it might be aiming to become, for UI5, what the Microsoft tools were for Visual Basic. There was also App Builder, which one might say was a competing product, from the Sybase stable. And how can we forget the tools and accelerators for various workstation versions of Eclipse.
What came out of that cloud of dust is what is becoming a very fine product indeed – the SAP Web IDE. Technically based upon Eclipse, but Orion – meaning the offering can be cloud-based, which it is. That said, there are the occasional releases of personal versions to run on one’s workstation, but of course these are still web-based – you’re just running Orion locally.
This is not a new concept. While today no-one bats an eyelid when we talk of running web servers locally on our laptops, it was a big “aha” moment for me and many others back in the 1990’s when one of my all time heroes Jon Udell wrote about the concept in Byte magazine a long long time ago now. There’s an online version of the article here: Distributed HTTP.
Anyway, I won’t go into all the features of the Web IDE here – find out for yourself in this unit. You’re not attending the course? Get that sorted now!
Unit 2 “SAP Web IDE App Development Basics”. This unit covered the basics in terms of what features the Web IDE has to support the end-to-end process described in Unit 1 – Prototype – Develop – Test – Package & Deploy – Extend.
One of the challenges when developing UI5 and Fiori apps is the data. Where is it, what does the structure look like, and is it actually available at all yet? The mock data services within the Web IDE go a long way towards smoothing over the answers to these questions. Often you’ll be developing an app before a backend OData service is even available. Perhaps that’s your modus operandi anyway. And even if the OData service is built, there may be no actual data to test with. With the mock data services you can mock your backend very nicely. See the last unit of this week (towards the end of this post) for more content on mock data services.
And with the Web IDE you have many of the facilities you’d expect in other IDEs – code completion, the ability to lint and beautify, integration with source code control (in the form of git, of course) and more.
As a (very) long time vim user, I have to say that an IDE (rather than “just” an editor), and one in the cloud, is a concept that doesn’t come naturally to me. But what the Web IDE offers is too good to ignore, so it’s become my companion working environment of choice. And I recommend it to clients and colleagues alike if they’re wanting to start on their Fiori journey.
**Unit 3 “Creating Your First SAP Fiori App with SAP Web IDE Templates”. **One of the reasons why the Web IDE is my companion working environment is covered in this unit: App starter templates and reference apps. I built my own starter templates a good while ago for my own development workflow, but I don’t maintain them, and there’s only a couple of them. With the templates available in the Web IDE, you can hit the ground running and have a working basic app in a matter of minutes.
And the templates are maintained too; this means that as the best practices improve, and the maturing of UI5 continues, there are differences in approach that you want to make sure you capture. With the plugin based architecture of the Web IDE, you can even build your own templates. As an experiment, a good while ago now when this was quite new, I created a custom template that allowed you to get started quickly with test data from a Google spreadsheet: SAP Fiori Rapid Prototyping: SAP Web IDE and Google Docs.
An equally good reason to look at what the Web IDE has to offer are the reference apps. These are full blown apps that are a great source of wonderment – audited source code that covers myriad functions and mechanisms in real Fiori apps. You either enjoy reading source code or you don’t. If you do, you’re in for a treat. If you don’t, grasp the nettle and at least have a go. I’ve always maintained that reading other people’s source code is educational (sometimes to see how not to do something!). And here’s no exception. The world of SAP development is changing – use these resources to give yourself a leg up. And SAP – more of this please!
Unit 4 “Enhancing Your SAP Fiori App with SAP Web IDE”. This was a fairly straightforward unit, where the instructor takes us through a couple of examples of enhancing existing SAP Fiori apps. Rather than use the visual editor, we are shown the regular editor where the view is modified by adding XML elements as shown in the screenshot from the video below. This is fine, and my preferred modus operandi.
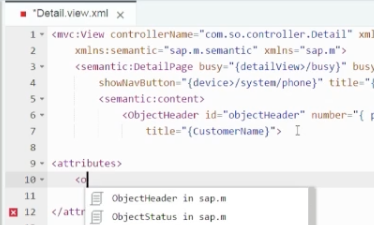
But I do wonder if attendees are thinking: “how would I know that I could or should place an
If an XML element starts with a capital letter, it represents a control. For example, we see on line 6 in the screenshot, an
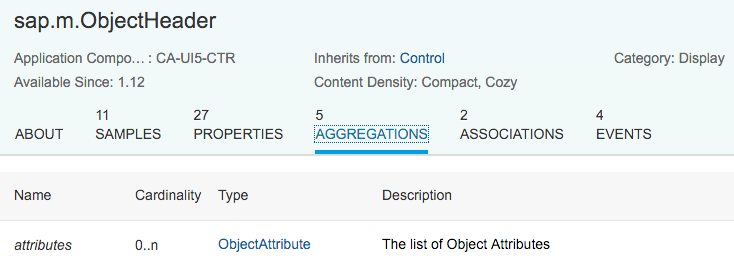
. If you look at the reference for this Object Header control in the excellent Explored app within the UI5 SDK – sap.m.ObjectHeader – you’ll see in the Aggregations tab a list of aggregations. And there you’ll find the “attributes” aggregation, which contains entities of type “ObjectAttribute”. And these are the children that can be placed inside the “attributes” aggregation.
So yes, you guessed it – whereas controls are represented as XML elements with capitalised names, aggregations are represented by XML elements starting with lowercase letters. So
here in line 9 is the start of the list of Object Attributes within the “attributes” aggregation belonging to the Object Header control.
I’m sure that this sort of information will be covered in much more detail in the upcoming openSAP course on SAPUI5 – watch this space! :-)
Unit 4 “Testing an App with Mock Data”. Ahh, a pain point in every developer’s workflow – “Where do I get the data to test?” “When will the backend service be ready?” “Can I start development sooner?”. Well with the mock data service things are a lot smoother than you might imagine.
It’s definitely worth studying the Web IDE features explained in this unit. While the OData Model Editor is still something I’d like to see improved (adding some visual aspects to the editing process, rather than still having to edit at the rather verbose EDMX level), it’s still a great first step, especially with the visual display of the entities and their relationships:
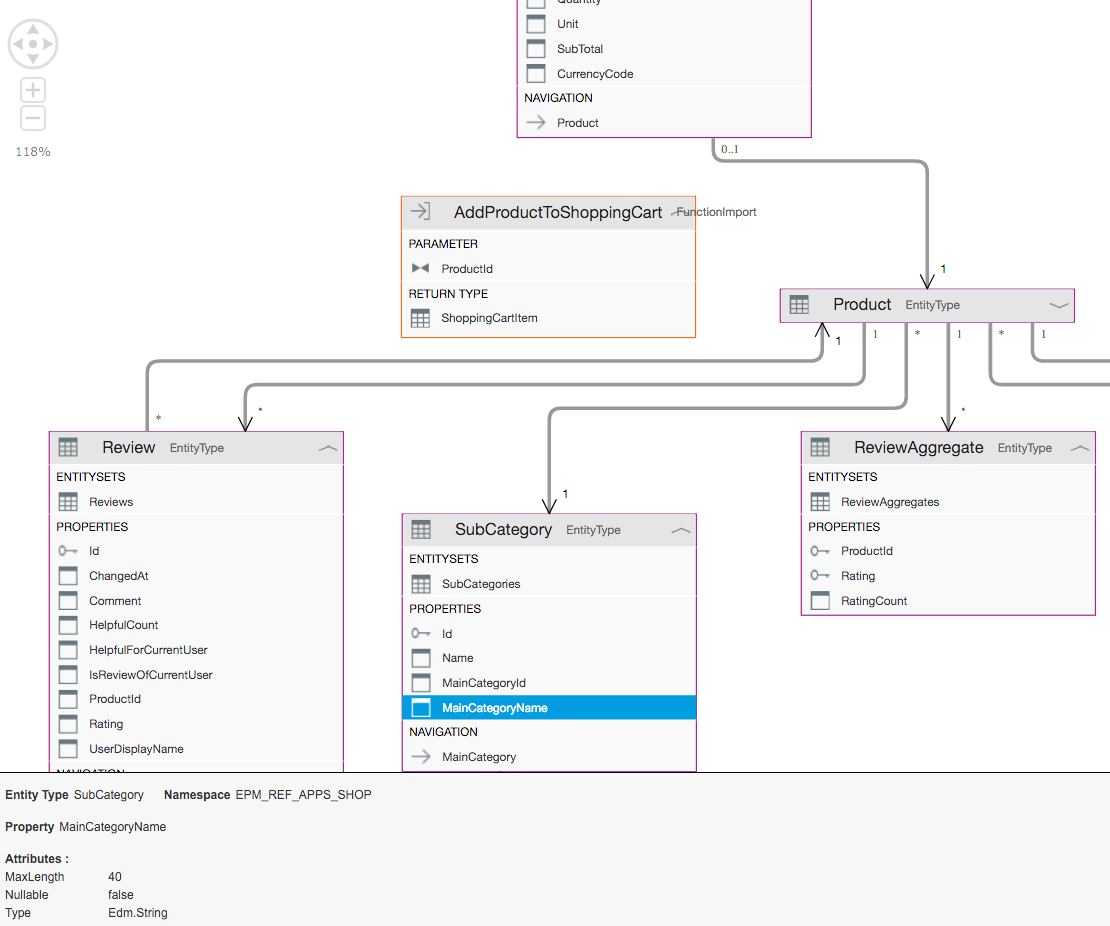
It’s a shame that this wasn’t shown in this unit.
What was shown is the the Mock Data Editor is definitely easy to use and a great boost to your testing workflow. If you’re going to invest some time on this week’s content, this unit is where you should focus your efforts.
And with that, week 5 is just about to start. See you next time!